|
Bill's Dynamic Range Photoshop Action Set
Action created by Bill Richardson © All rights reserved.
Introduction To Dynamic Range:
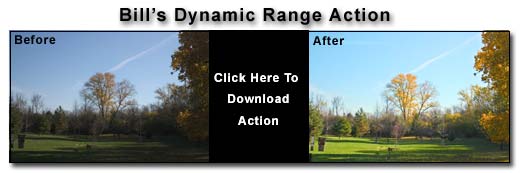
As we know all too well, digital cameras have a limited dynamic range resulting frequently in blown (white) skies and/or dark shadows lacking detail.
The first action, Light Blending, allows you to adjust an image's highlights and shadows independently and simply, using opacity sliders. It works well for a lot of good photos but cannot significantly increase dynamic range. If the sky is truly blown or the shadows are pure black, this will not help because all detail has been lost already. You will still need to use my Blown Sky action to insert a blue sky because the real sky was lost. Nevertheless, it is a very handy action for general editing. This action was created using a selection technique I learned from Arjun Roychowdhury who has generously allowed me to share it with you.
The second action, Bill's Dynamic Range Extender can really extend the dynamic range of your image. (You can throw away those aggravating Neutral Density filters!) It requires 2 exposures of the same image: one exposure for highlights and one for shadows. You can do this by bracketing exposures using a tripod and shooting at a constant aperture to maintain DOF. (You can also try using one image, adjusting it for shadow detail and saving it, and then adjusting it for highlights and saving it, to create 2 exposures but this is less effective because any blown highlights cannot be recovered.) However, by far the best way of using this action is to shoot one image in RAW and create the 2 exposures from that since no details are lost in RAW in the camera. (I just started shooting RAW and it is a wonderful option.) Once you have your 2 exposures, it is easy to blend them together using this action.
Download & Installation Instructions: Please note that the action has only been tested for Adobe Photoshop Version 7.0. It might work on lower versions but it has not yet been confirmed. All tested versions will be posted on this page as soon as results have been confirmed. The download of the Bill's Blown Sky Action is extremely fast due to the small compressed file size. The name of the file is: dynamicrange.zip. The dynamicrange.zip file must be unzipped to extract the action file named Blownskyset.atn.
If this is an upgrade to an earlier version of the Dynamic Range Action, delete the old action version from the Adobe Photoshop action menu. The Billsdynamicrange.atn file must be placed in the Presets/Photoshop Actions folder that is located in the Photoshop program folder. Click on Photoshop Help ---> Search ---> and enter "action" for the searched word. The Adobe Photoshop section entitled "Saving and Loading Actions" explains the exact location and procedure for the action file depending on the type of operating system you are using.
In the Adobe Photoshop Action Window, click on the little circular arrow located in the top right hand corner of the window. Select Load Actions and then select the file Billsdynamicrange.atn. The new action will only be displayed if you copied the Billsdynamicrange.atn action file into the correct directory.
Please DO NOT send any email questions to Outdoor Eyes regarding the installation or use of the Dynamic Range Action. Thank you.
| 
