|
Kayaking offers unusual opportunities for photographers since wildlife and land is seen from a completely different perspective. Your perspective is viewing water to land instead of the usual land to water.
You also have the ability to access places that you are usually not able to see or get near. But, at the same time, kayaking photographers must make a multitude of critical decisions regarding the storage of camera gear and the possible danger of kayak photography. After the issue of ruining the camera has been overcome in your mind, kayaking photography is a process that will be enjoyable and rewarding. Be brave, take a deep breath and you will be rewarded tremendously with your camera on the water. Whatever you decide to use for your Camera Protection System (CPS) will be the right choice. There is no clear cut perfect system, no matter how long you research the choices.
Exercise 1:
There is one basic rule that must always be followed before you begin kayak photography: "Do not attempt kayak photography until you practice exercises 1 and 2." When you place a camera in your hand(s) while sitting in a kayak, you lose kayak stability as your paddle creates the necessary balance
 needed in calm as well as difficult water situations. Your paddles are used to balance and brace yourself the same way as a high-wire trapeze artist uses a horizontal pole to keep balance high on the thin wire. Before you try kayak photography, paddle to a quite and safe area. Take your paddle and place it directly across the cockpit of your kayak and just sit there. For extra safety, use a paddle leash, when the paddle is on the cockpit. Read the choices of paddle leash options. Rock from side to side by bending your hips and putting the kayak up on edge. Sit there until you feel comfortable and safe. Practice lifting the paddle from the cockpit, while at the same time placing the paddle into the correct paddling position. Once you feel comfortable in a calm situation, place yourself in a area where there is a slight current and practice the same procedure. Keep placing yourself into stronger currents and small waves. Once you feel uncomfortable with the stability of your kayak, you can't attempt kayak photography. Keep in mind that there are other elements with kayak photography that will affect your kayaking stability. Based on how you're going to protect your camera, where your camera will be stored, the type of kayak photography, the type of kayak and the type of paddling will dictate what you need to practice in order to become comfortable and efficient in kayak photography. Practice without a camera until you feel safe and stable. Once you feel secure, select the best CPS and then practice kayak photography with Exercise 2.
Protecting Your Camera:
There are many pros and cons concerning the available choices for protecting your camera. It comes down to your confidence level of what CPS is necessary for your camera while kayaking. Keep in mind that your camera can not be kept under your deck rigging for any extended period of time as your camera will heat up due to the sun shinning directly overhead. Depending on the color of the deck, the type of material that the kayak is made of, and other factors will also affect the temperature of the CPS.
Pelican Plastic Case (figure 1):
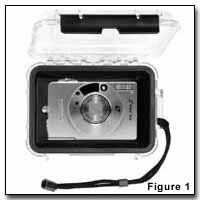 The Pelican case protects a camera as it is watertight, airtight, crushproof and has an automatic pressure purge valve. The case comes in multiple sizes as well as numerous colors. The case includes a ring and a lanyard for easy attachment. The case is excellent for kayaking when you need to protect your valuables from water, falls, knocks and the sun.
Pros:
1) Totally waterproof and will not corrode.
2) Crushproof
3) Protects camera and lens with foam padding that can be custom formed to fit your gear.
4) Fits easily into your kayak.
Cons:
1) Difficult to open and remove camera fast and effectively.
Aquapac Clear Bag (figure 2):
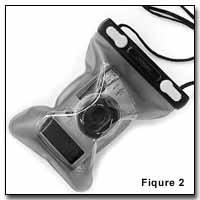 The Aquapac camera case is constructed out of 'Ultra-Clear' vinyl, ideal for digital cameras, where the lens is not always central. This camera case will also fit most zoom compact cameras. This is the CPS that I use exclusively since I need to easily open and shut it. This allows me to remove the camera quickly and replace the camera quickly in demanding situations. I eliminated the original straps on the case and I replaced the straps with 1/4" bungee and a fast clip. This enables me to attach the CPS to my deck rigging in tough situations. I can also slide the CPS temporarily under the deck rigging.
Pros:
1) Extremely easy to open and close to remove and replace the camera.
2) The camera can be used inside the bag as most of the controls of the camera can be adjusted.
3) Totally waterproof and will not corrode.
4) Fits easily into your kayak or into your PFD pocket.
5) Floats when dropped in the water.
Cons:
1) The bag does not adequately protect the camera from damage when tossed around inside the kayak. You might want to consider additional padding to wrap around the camera either inside or outside the bag.
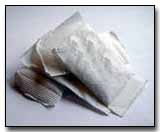
Dry Bag (figure 3):
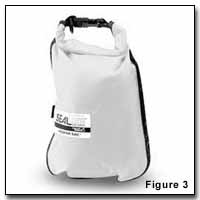 The dry bag protects photographic camera as it is watertight, airtight and crushproof. The case is excellent for kayaking when you need to protect your valuables from water, falls, knocks and the sun.
Pros:
1) Totally waterproof and will not corrode.
2) Crushproof
3) Protects camera and lens with foam padding that can be custom formed to fit your gear.
4) Fits easily into your kayak.
5) Floats when dropped in the water.
Cons:
1) Difficult to open and remove camera quickly.
2) Takes more space than the plastic case or the clear bag.
A Suggestion:
 You might want to consider adding a silica gel packet into whatever camera protection system you decide to use. The silica gel packet will remove any condensation that might occur in the case or bag. The condensation is usually just a nuisance versus something that will cause considerable damage to your camera. The condensation occurs when the bag or case is constantly opened and closed. There is humidity and, possibly a little spray from the waves that might get into the bag or case. When the sun heats it up, some condensation will occur.
Once a Camera Protection System (CPS) has been selected and purchased, decide where the easiest and the best place to store your CPS. The placement will depend on the type of kayak that you paddle. You have to decide what will be best for your needs. There is also another element that enters into your decision. If you use a spray skirt while paddling, this will affect your decision as you will not want to constantly open and close your spray skirt as this really defeats the use of your spray skirt. Also, you might have a few places to store your CPS based on the weather or the season. In colder weather, you might use a deck bag that will store your CPS.
Exercise 2:
Place your CPS into your kayak and repeat all the exercises in Exercise 1. When you place your paddle across the cockpit, take your CPS and remove your camera from the CPS. Lift your camera up with your hand(s) and pretend to photograph. Then, take your camera, put it back into the CPS and place the CPS into to the original storage area.
Questions To Ask Yourself:
1) Is it difficult to open the CPS and photograph in calm water and perfect conditions?
2) Are you unstable in your kayak when your hand(s) hold the camera with your paddle across your cockpit?
3) Did the kayak start moving even though you were in calm water?
4) If you weren't in the correct direction for a photograph, what did you do when you didn't have a paddle in your hands?
5) If you feel uncomfortable, how are you going to photograph when the conditions are less favorable?
6) Did you decide on the wrong place to store your CPS?
7) Are you happy with your choice of CPS or should you consider another option?
8) What photography method are you going to choose during different weather conditions?
Practice, practice and practice. You will be rewarded with kayak photography. Remember, don't ever put yourself in a dangerous situation with kayak photography. It is not worth a dunking of your camera and yourself. Read about kayak photography hints & tips.
| 
