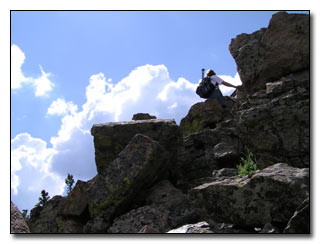
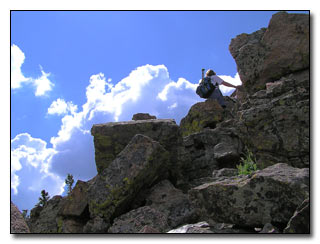
One quick technique for enhancing the exposure latitude of an image is applying Blend modes to a selection of the highlights. This Adobe Photoshop technique may allow you to enhance the highlight and shadow information contained in the image. Naturally, this won't work on all images and certainly won't fix blown highlights. Landscape images are the images that benefit most with this quick fix.
1. Open the file. Choose File --> Open --> Enter the image name.
2. Hold the Ctrl Key down and hit the + key a few times to zoom in the image to a size you need to work with.
3. Here's a fast way to select highlight information: Press and hold the (Ctrl) and the (Alt) keys. Then press the Tilde key ~ (the key above the Tab key). Different areas on your photograph will be selected with dotted lines.
4. Choose Select --> Feather and set the feather to 2 or 3 pixels to feather the edges. Click OK. (Figure 1 - A)
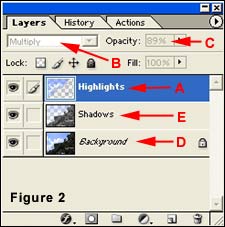
5. Put the selected area on its own layer by either (Ctrl+J) or Choose Layer --> New --> Layer Via Copy. Rename the layer 'Highlights' by double clicking on the 'Layer 1' name in the layer palette. (Figure 2 -A)
6. Change the Blend mode in the Layers palette to 'Multiply' and the highlights will gain additional density. (Figure 2 - B) Click the Opacity slider and change the percentage to the needs of the photograph. (Figure 2 - C)
8. Select the Background Layer in the layer palette by clicking on the Background Layer. (Figure 2 - D)
9. Select the highlight information again by pressing and holding the (Ctrl) and the (Alt) keys. Then press the Tilde key ~ (the key above the Tab key). Different areas on your photograph will be selected with dotted lines.
10. Choose Select --> Inverse to invert the selection resulting in the selecting of the shadow information.
11. Choose Select --> Feather and set the feather to 2 or 3 pixels to feather the edges. Click OK. (Figure 1 - A)
12. Put the selected area on its own layer by either (Ctrl+J) or Choose Layer --> New --> Layer Via Copy. Rename the layer 'Shadows' by double clicking on the 'Layer 2' name in the layer palette. (Figure 2 - E)
13. Change the Blend mode in the Layers palette to 'Screen' and the highlights will gain additional density. (Figure 2 - B) Click the Opacity slider and change the percentage to the needs of the photograph. (Figure 2 - C)