|
Sometimes you need to use the same Adobe Photoshop action on multiple images. You could open each image one at a time and use the necessary action on the image or you can use the batch process to make your work faster and more efficient.
How To Use The Batch Process
Before starting the batch process, make a new folder in your computer named ActionFolder. Copy (Not Move) the images to this folder that you want to process. You now will have a duplicate copy of all your images after the action has been run and you will not lose any of your original images. In this example, the images are batch processed and copied back to the same folder over the original image. The image used is a duplicate copy of the original so the original image is not lost.
1. Choose File --> Automate --> Batch.
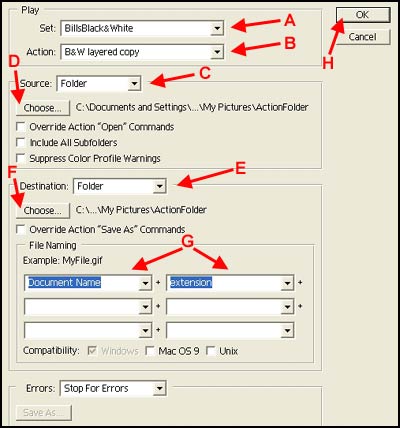
2. Select the Action that will be applied to each image (A).
3. If the action has multiple choices within the action, select the Action Choice (B). If the action only has one part, a choice will not be necessary.
4. Set Source to Folder (C). Click the Choose button (D) and select the Folder that the images are located in (ActionFolder). Leave all of the next 3 boxes unchecked.
5. Set Destination to Folder (E). Click the Choose button (D) and select the Folder that the images are located in (ActionFolder). After the action has been run, the changed image will be copied over the original image in the ActionFolder.
6. Set the File Naming to Document Name and Extension to use the original image name (G). You always have the option to specify a naming scheme for saving your images so the new ones will not write over the old copies.
7. Click the OK button to run the batch (H).
| 
