|
1. Butterfly: (Glamour or Paramount): Little shadow under nose that can resemble a butterfly.
a. Light Placement: High and frontal casting a shadow downward. The shadow should not hit the lip. The shadow should not stray to one side or the other.
b. Light Type: Front Lighting.
c. Best on young, thin and symmetrical faces. May highlight the ears making the prominent and undesirable.
d. Tends to widen faces.
e. A glamour style of lighting. Can be used on men, but make sure mustaches don't interfere with shadow. Used to smooth facial wrinkles.
f. Does not emphasize crows feet, forehead wrinkles, or lines around the mouth. Good for older people.
 g. Smiling raises the lip so watch the shadow.
h. Fill light or reflector should be close to camera axis and directly below it.
i. Flexible: Can be from full face to profile, but nose shadow must remain in the same position. Hair light must be moved, but fill remains the same.
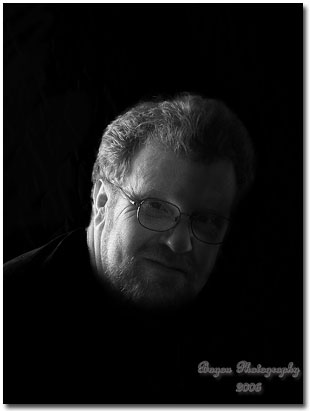
2. Loupe: Looping down from the nose to the corner of the mouth.
a. Light Placement: As close to frontal as you can get, and still produce a loupe.
b. Light Type: Front
c. Most universal and fits most people.
d. Shadow can be long or short.
e. Widens face
3. Rembrandt: This is the highlight triangle that goes from the inside of the eye on the shadow side to the out side of the check at eye level, and then cuts back into the mouth to for a highlight triangle.
a. Light Placement: High and to the side, and is short lighting.
b. Light Type: Three-Quarter
c. Like a loop, but the shadow extends larger to make the highlight smaller.
d. Traditionally, there is no highlight triangle.
e. Narrows the face
4. Split: Half the face is in shadow
a. Light Placement: Same level as face, but what side angle
b. Type: Side lighting
c. Shadow runs down middle of nose
d. Narrows the face
e. Good for females with nice skin and men where a rugged look is wanted—from the shadows on the side of the face.
5. Double Kickers: Light is placed behind the subject to skim the cheek.
a. Light Placement
b. Traditionally, two lights are used
c. Good for older or "time weathered faces."
d. Can be used with dark skinned people well
e. Rarely used on females
f. Narrows the face
6. Rim: Profile shot.
a. Light Placement: Behind the subject. Puts entire face in a shadow.
b. Rim lighting is often used when making profile portraits. Rim lighting is the same as backlighting, where the subject is lighted from behind causing the facial features of the profile to be highlighted. Some suggestions to use when taking profile portraits are as follows: In a profile portrait, when a person looks straight ahead, only the whites of the eyes are seen by the camera. This causes an undesirable effect. Instead have the eyes cheat-turn the eyes slightly toward the camera, without turning the head, to show enough of the iris so the eye can be seen as an eye, not a white ball. Have the subject's head tipped back slightly. This separates the chin from the far shoulder, gives a better neckline, and reduces the appearance of a double chin. Allow more space on the side of the picture toward which the eyes are looking. This allows the subject to "look" beyond the frame.
c. This can also be used as a hair light.
Addendum:
• Light at camera Axis: Produces flat lighting.
• Three quarter lighting: 45 degrees from the front. Illuminates ¾ of the face. Three quarter lighting is flexible because after the light is set, the subject can move her face from profile to full face, and the lighting remains good.
• Broad and Short: Both are considered ¾ lighting. Rembrandt would be ¾ also.
• Side lighting and Front Lighting: Placement is self explanatory.
• Pleasing and Natural Portrait Lightning: Produces prominent highlights on the forehead, nose, cheeks, and chin with enough shadows to round out the facial features.
• Full face: Widens, while partial thins.
• Highlights: On the forehead, upper cheeks, bridge of nose and chin, evenly to give brilliance. Highlights too big wash out the face and produce a flat portrait.
• Hair Light: Usually on a boom shinning from above and behind on the subjects head. The intensity is dictated by the color of the hair and background and the sheen of the hair. Place on opposite side of main light, and use a grid or snoot to focus the light so it does not spill over to the face and other areas. Turn off the light for exposure reading (not absolutely sure about this but sounds right).
• Background Light: Aimed at the background to give separation between the subject and the background. Position it so the brightest point is directly behind the head, and the light falls off gradually in all directions. This separates the head from the body.
• Light position: Most are 45 degrees above and to the side. The closer the light the lower the light can be and still maintain a 45% angle. Further away, the higher the light needs to be. While there are standard light heights and angles, simply move the light to get shorter or longer shadows. Higher or more to the left or right for more shadow, opposite for less.
• Catch lights: 11 AM to 1 PM usually
• The fill light: The fill light should be as close to the axis of your lens as you can get it. A fill light should be a diffuse, non-directional light, a medium to large soft box works well. Stay away from umbrellas for the fill because they are very directional. Most umbrellas are parabolic in shape and believe it or not are more directional than a straight flash head in a standard reflector. Note: The object is to get rid of shadows, not create new ones, thus camera axis position, but experiment.
• Feathering: Moving the light to an angle so the center of the light does not hit the subject, but it's softer edge. This will help highlights to not blow out.
• High-key: color pictures contain large areas of light desaturated colors (pastels) with very few middle colors or shadows. Intentionally overexposing color film (exposing for the shadows) helps to create a high-key effect.
• Low-Key: Darker colors and attention to shadows. Silhouettes are low key.
Corrective Positioning and Lighting:
1. Fat, round face: Shoot three-quarter view, light side of face away from camera. Use three-quarter or side lighting.
2. Thin Face: Shoot front, full face. Use three quarter or side lighting.
3. Wide Forehead: Low camera viewpoint, and tilt chin upwards.
4. Narrow Forehead: Use high camera viewpoint.
5. Baldness: Low camera viewpoint, little or no hair light, blend head with background.
6. Eyes Close Together: Three quarter pose.
7. Eyes Far Apart: Three quarter pose.
8. Small Eyes: Three quarter pose, and three quarter lighting so eyes are in shadow.
9. Large Eyes: High three quarter lighting, and lower eyes slightly.
10. Deep Set Eyes: Low camera viewpoint and use frontal lighting to keep eyes out of shadows.
11. Uneven Eyes: Turn head to one side so natural perspective eliminates uneven appearance.
12. Bags Under Eyes: Use make-up and front lighting.
13. Crossed or Defective Eye: Turn head so bad eye is away from camera, and place other eye in shadow.
14. Glasses: Use high front, three quarter, or side lighting to eliminate shadows. Raise temple piece up slightly to angle lens downward. Use full face to prevent lenses from splitting cheek line. Use indirect diffused lighting.
15. High Cheeks: Low front or side lighting.
16. Wide Cheeks: Three quarter pose.
17. Small Ears: Pose so as to see only one ear. Place exposed ear in shadow.
18. Large Ears: Pose so as to see only one ear. Place exposed ear in shadow.
19. Protruding Ears: Pose so as to see only one ear. Place exposed ear in shadow. Shield light from exposed ear and put it in shadow.
20. Long Nose: Use low camera viewpoint. Three quarter or side lighting.
21. Short Nose: High camera viewpoint, and front lighting.
22. Hooked Nose: Low camera viewpoint. Front lighting, full face.
23. Crooked Nose: Shoot from the side to which it curves. Turn head until highlight on ridge of nose appear straight.
24. Broad Nose: Pose head away from front view.
25. Narrow Mouth: Use lip color to extend lip line. Turn head to one side so make-up is not apparent. Position modeling light high to cast shadows at end of lips.
26. Wide Mouth: Pose head in three quarter view.
27. Protruding Lips: Use low modeling light to eliminate shadows under lip.
28. Thin Lips: Fill out with lip color.
29. Uneven Mouth: Pose in three quarter view.
30. Bad Teeth: No smile.
31. Buck Teeth: Subject may have small smile, and pose full face.
32. Long Chin: Use high camera viewpoint.
33. Double Chin: Keep chin in shadow. Have subject look forward and look at camera.
34. Small Chin: Use full front pose. Low camera viewpoint.
35. Square Face: High camera viewpoint.
36. Oval Face w/weak Chin: Low camera viewpoint.
37. Short Neck: Use low camera viewpoint.
38. Long Neck: Use high camera viewpoint and keep neck in shadow.
39. Facial Blemishes: Keep out of camera view, make-up.
|

