Return to the Outdoor Eyes home page. Subscribe to the free outdoor photography and outdoor adventure newsletter. Send free outdoor adventure photo ecards. Join the Outdoor Photography Forum and the Find A Partner Community. Complete Outdoor Adventure Index: outdoor adventure tips, tutorials, techniques and articles on hiking, kayaking, gps, snowshoeing, backpacking, birding, camping, expeditions and more. Complete Outdoor Photography Index: outdoor photography tips, tutorials, techniques and articles on nature photography, wildlife photography, bird photography, gear, promoting yourself, marketing, digital editing, adobe photoshop actions and more. The Gallery index of photographers from around the world. Search the Gallery to view or purchase photographs. Learn how to create your own Gallery. Submit your favorite photograph in the outdoor photography contest. Contest winners receive a free gallery. Digital editing techniques, tips, tutorials, articles and download adobe photoshop actions. Photography techniques, tips, tutorials, and articles. Wildlife photography tips, tutorials, techniques and articles. How to photograph national parks, wildlife and nature.  Nature photography tips, tutorials, techniques and articles. How to use and how to choose photography gear. How to promote, sell your photographs and also helpful marketing articles to help you promote yourself. Bird photography tips, tutorials, techniques and articles. The Outdoor Eyes Find A Partner Community is for members to find friends to participate in your outdoor activities. Submit an outdoor adventure or a photography article for the Outdoor Eyes monthly newsletter. Your article will also be listed in the Outdoor Eyes indexes. Read the stories behind the outdoor adventures and expeditions. Birding, wildlife tracking tips, tutorials, techniques and articles. Nature & outdoor tips, tutorials, techniques and articles. Hiking, camping and backpacking tips, tutorials, techniques and articles. Trail guides to National Park trails and state trails. Snowshoeing tips, tutorials, techniques and articles. Kayaking tips, tutorials, techniques and articles. Download GPS waypoints for hiking and kayaking. GPS tips, techniques and articles.

Click here to visit Pennie Reid.
Pennie Reid's Gallery:Click here to view 2 thumbnail images from Pennie Reid's Gallery.Click here to learn about Pennie Reid.Click here to view Pennie Reid's photograph sizes & prices.Click here to read the visitor comments about Pennie Reid's Gallery.Click here to contact Pennie Reid by email. Visit
Pennie Reid
Sell your photographs online. Join the many amateur, advanced & professional photographers from around the world. Learn how to create your own Gallery.
Have great outdoor adventures with your No limits... No boundaries Outdoor Eyes Cap!

Adjusting Contrast & Bring Out Shadow Detail Technique
Photography And Text By Mahesh (subscriber contributor) © All rights reserved.

Set-up Photography © Mahesh Before Set-up Photography © Mahesh After

With digital, it behooves one to shoot for the highlights. But this forces you to compromise a bit at the shadows. In addition, many of us shoot with low contrast to make sure we get as much dynamic range as possible, opting to adjust the contrast/curves later in Photoshop. Here are the steps I take to quickly adjust contrast and bring out some shadow detail.
 
1. Open the file. Choose File --> Open --> Enter the image name to be fixed.
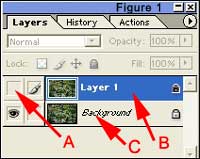
2. Choose Layer ---> Duplicate Layer (Ctrl J) to duplicate the layer, which will create a "background copy (Layer 1)" layer (Figure 1 B).

Adobe Window Adobe Window

3. In your layers palette, click on the little eye icon to the left of the "background copy" layer to make that layer invisible (Figure 1 A).
4. Click on the "background" layer to make that layer active (Figure 1 C).
5. Perform an auto contrast on this "background" layer (Ctrl-Alt-Shift-L). Don't worry if the highlights get blown.
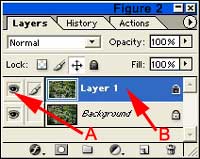
6. Now click on the "background copy" layer to make it active and the little eye icon to the left of this layer should be seen again (Figure 4 A & B).
7. Choose Select ---> Color Range. Under the Select drop down menu choose "Shadows" from the list and click "OK".
8. Choose Select ---> Feather. In the "Feather" window, choose a relatively large feather radius value (between 50-120 or so) and click "OK". For the above image, 75 was chosen.
9. Choose Select ---> Inverse to invert the selection (Ctrl-Shift-I)
10. Choose Layer ---> Add Layer Mask ---> Reveal Selection.
11. Choose Layer ---> Flatten Image to flatten the layers. Save the file with a new name.


Risk free OPEN YOUR OWN GALLERY & SELL YOUR PHOTOGRAPHS ONLINE

PROMOTION TODAY: A 25% discount is available for a Professional Gallery Registration.
PROMOTION ENDS: Monday, May 12, 2008.

RISK FREE GUARANTEED: If you're not satisfied with The Gallery, cancel anytime within 30 days, and you will receive a FULL refund.
 Click here to about the gallery.

Outdoor Eyes Welcomes The Newest Gallery Members: Jim Sawhill, John Waggoner, Frank Castellano, james caine, Toni Leland, Deborah Simone, Donny Doyle, RG DeMartin, Bonnie Valentine, Hans Schroeder, Elena & Dennis Workman
Search Outdoor Eyes For Educational Articles, Photographs, Photographers & Ecards.
Search For:    In the:    
Photography Outdoor Adventure The Gallery Forum Contact OE OE Caps Newsletter Site Map Ecards Find A Partner Home
Use Of Information    © 2000-2008 Outdoor Eyes   All rights reserved.  Privacy & Terms