|
CAPTURING INVISIBLE LIGHT:
To the human eye, infrared is a colorless and invisible spectrum. Fortunately for photographers, infrared light can be captured on film and via digital media, with interesting and sometimes colorful results.
"Wait a minute!" you shout. "I've only seen black and white IR photographs! What's this about color?" While black & white infrared film is fairly common, color IR film has been around for a while - Kodak's Ektachrome IR is one example. It's expensive, requires special care when loading, and requires special processing. According to a Kodak press release, the film is used primarily by "photographers interested in producing special-effects images, scientists, and forest/crop-management professionals."
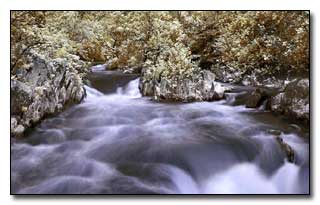 Fortunately, the advent of digital photography has made IR capture relatively easy and inexpensive for the masses. An IR-sensitive*(see below for test) digital camera, an IR pass filter and a tripod are the only requirements to capturing landscapes in a different light (pardon the pun). The photograph at the right is a shot of the Potomac River captured with a Canon G1 and Hoya R72 IR filter, 3.2s at f6.3:
Notice how what the green foliage is now an orange-yellow, while "cool" colors such as the water and rocks are still "cool." This is because different colors and materials reflect IR light at different frequencies, resulting in sometimes bizarre color shifts. Even different shades of the same color will reflect IR differently. For example: evergreen foliage will look different from deciduous foliage. (I won't get into a botany discussion here, but IR reflectance from plants has something to do with the relative sponginess of a plant's mesophyll. (I never cared much for biology, so you're on your own if you want to research it further.)
OUT OF SPECTRUM:
The colors we see in IR photography come either from a chemical process (in the case of color IR film) or a combination of hardware and software (in the case of digital cameras.) For this reason, color IR photography is commonly called "false color" infrared.
Additionally, I should note that what I'm really referring to here is the "near infrared" spectrum of 700-1200nm, the electromagnetic wavelengths just beyond visible red. This is the area of reflected IR, while the farther IR spectrum (3000nm or so) is the area of thermal IR wavelengths - the stuff of thermal imaging, which is way beyond the scope of this article. For discussion purposes, I am using IR and near-IR interchangeably. Also, for reference only, visible light falls in a fairly narrow band between 400nm (violet) and 700nm (red.) Thus, the broader color spectrum ranges from ultraviolet (below 400nm) to infrared (above 700nm). Whew!
HOT MIRRORS AND IR PASS FILTERS:
With digicams, the main factor that impacts sensitivity to the IR spectrum is the camera's internal IR cut filter, also called a hot mirror. The hot mirror is there to block IR light (and perhaps there are other reasons as well,) thereby reducing or eliminating IR contamination. Whether or not this is a severe problem is debatable; the fact remains that the hot mirrors are there. However, apparently not all hot mirrors are the same, which may be why some digital cameras seem to be more sensitive to IR than others.
One can even go so far as to replace the hot mirror with clear optical glass and have an IR-dedicated camera, as some of my acquaintances have done. (My Canon G1 is my only camera, so until I upgrade to a DSLR I can't take the plunge. Also, this would surely violate the terms of your camera's warranty, so beware!)
The choice of IR pass filter can influence the outcome. The Hoya R72 that I use (equivalent to a Wratten 89b, I believe, if you are comparing other manufacturers filters) is popular because of its relatively low price, availability, and its lower-frequently IR pass (720nm.) A wratten 88a has sensitivity starting at 750nm, while a Wratten 87 filter starts even further into the near-IR spectrum, and therefore does not seem to do as well with most digicams. Your mileage may vary.
I'm not sure if a digital camera's imaging sensor comes into play, and I haven't read any evidence in support or to the contrary, but it is widely speculated that the Canon G1, Nikon 990 and Oly 30x0 series use the same Sony 3.34mp CCD. By coincidence or not, I have seen similarly crisp IR work from all of those cameras. (And from what I've read elsewhere, the Oly 2020 is apparently very sensitive to IR even with an 87 filter.) So is it the CCD or the hot mirror that makes the difference? Given the results I've seen from dedicated IR conversions, I'd speculate that it's the hot mirror more than the CCD, but I could be wrong.
SOFTWARE:
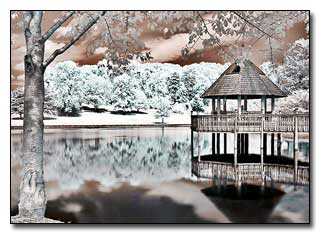 Another factor is the camera's internal processing software. While some IR-sensitive cameras will produce IR images which are predominantly pink or orange depending on the white balance setting, some will produce images with a definite blue cast. Mine are usually hot pink straight out of the camera. Also, I usually shoot in RAW mode and adjust white balance later to suit my needs. By setting a custom white balance (custom-selecting my neutral spots,) I often end up with foliage in a light cyan color, and perhaps some residual pinks/oranges/browns here and there. The photograph at the right is an example of a G1 shot processed this way:
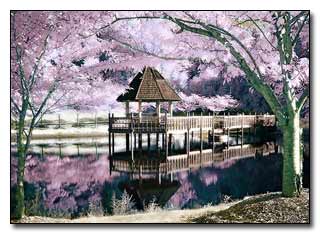
Of course, once you open the file in Photoshop or another image editor, the sky is the limit. Channel swapping is one alternative, simple adjustment of hue and saturation sliders is another, etc. You can even replicate the look of the Ektachrome IR film mentioned above. The photograph at the right (same gazebo, different day - it's a running series for me) involved some selective coloring to get the greens, though the pinks were more or less there in the original:
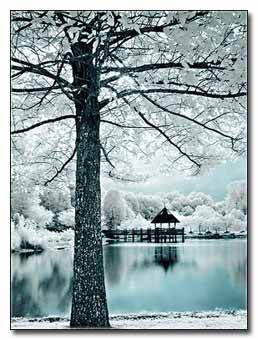
And finally, instead of B&W, one can also "tone" an IR image in any way desired. That's what I did with this one, yet another in the ongoing collection of gazebo shots.
I won't go further into the Photoshop techniques as they were discussed at length in the digital forum editing area. Also, there is a link to the B&W IR conversion process created by Martin Evening, author of Photoshop for Photographers.
PARTING SHOT:
I did mention above that a tripod is a necessity. An IR pass filter blocks most visible light and passes through the near-IR spectrum. As you can imagine, loss of light means a long exposure is necessary to compensate. Fortunately the small sensors on consumer point & shoot digicams allow for adequate depth of field even with the lens wide open, so don't feel obligated to stop down all the way to f8. In many cases I've had success just putting the camera in auto ( "P" ) mode and letting the camera do it's thing. Still, 1/10 second exposures are not uncommon, and they can be significantly longer if your scene is not especially bright, or if you are trying for a slow shutter effect.
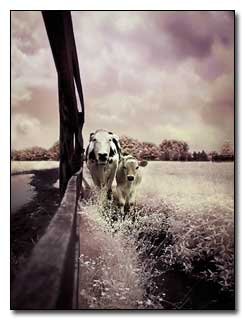
You might also try combining an IR filter with a wide angle lens, for even more drama. For this photograph at the right of two cows strolling along a farm fence, I used a Raynox 0.72x wide converter with my camera at full wide, giving me roughly a 25mm focal length, f2.0 at 1/5s:
*CAMERA IR TEST
Test your camera's IR sensitivity (credit for this goes to the Digital Infrared Basics article):
1. Point a TV, camera or other IR remote into the lens of your camera.
2. Press any button on the remote.
3. Look for the IR beam in the camera's TTL LCD or EVF (electronic viewfinder).
4. If the remote's beam looks bright, you should be able to get decent IR images—at least with the affordable dark red Hoya R72 filter or Wratten 89b equivalent.
|

